Interlock Design & Install
Interlock design and install is the process of planning and constructing outdoor surfaces using interlocking paving stones, often for driveways, patios, walkways, and landscaping features. The design phase involves selecting the layout, patterns, colors, and materials to match the surrounding space while also considering factors like drainage and long-term durability. The installation phase includes proper site preparation, such as excavation and building a strong base with gravel and sand, followed by carefully placing and securing the pavers so they lock together. This method creates a sturdy, weather-resistant, and visually appealing surface that requires minimal maintenance and can last for many years.
 |  |
|---|---|
 |  |
 |  |
 |
-
Interlock design and installation is the full process of planning, preparing, and building a hardscape surface (like a walkway, driveway, or patio) using interlocking concrete or stone pavers. It’s more than just laying bricks—it’s a structured construction job that ensures durability, drainage, and aesthetics.
-
Here’s what it typically involves:
-
🔹 1. Design & Planning
-
This is where the project is mapped out before any digging starts.
-
Choosing the layout and shape (straight path, curved walkway, large patio, etc.)
-
Selecting paver style, color, and pattern
-
Planning borders and accents
-
Considering drainage and slope so water flows away from the house
-
Measuring and marking the area
-
🔹 2. Excavation
-
The existing surface is removed to make room for a stable base.
-
Digging down typically 6–12 inches (depending on use—driveways need more depth)
-
Removing grass, soil, and debris
-
Ensuring proper grading for drainage
-
🔹 3. Base Preparation
-
This is the most important step for long-term durability.
-
Adding layers of crushed stone/gravel
-
Compacting each layer with a plate compactor
-
Creating a strong, level foundation that prevents shifting or sinking
-
🔹 4. Edge Restraints
-
Edges are installed to hold everything in place.
-
Plastic, metal, or concrete edging
-
Prevents pavers from spreading over time
-
🔹 5. Bedding Layer (Sand)
-
A thin layer of sand is added on top of the base.
-
Screeded (leveled) to create a smooth surface
-
Helps set and adjust the pavers evenly
-
🔹 6. Paver Installation
-
The visible part of the project.
-
Laying interlocking stones in the chosen pattern
-
Cutting pieces to fit edges and curves
-
Keeping lines straight and spacing consistent
-
🔹 7. Joint Sand & Compaction
-
Locks everything together.
-
Sweeping polymeric sand into joints
-
Compacting the surface to settle the pavers
-
Activating sand (usually with water) to harden and prevent weeds
-
🔹 8. Finishing Touches
-
Final cleanup and detailing.
-
Sealing (optional, for color protection and longevity)
-
Landscaping around edges (soil, grass, plants)
-
Final inspection for level and stability
-
🔹 What You End Up With
-
A durable, weather-resistant surface
-
Improved curb appeal
-
Proper water drainage
-
Minimal maintenance compared to poured concrete
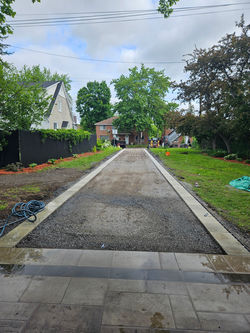
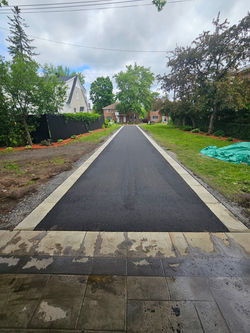
The installation process for an interlock walkway (or patio/driveway) is very structured—each step builds on the last, and skipping or rushing one is what causes most failures. Here’s how it actually happens on a proper job:
🧱 Interlock Installation Process (Step-by-Step)
🔹 1. Layout & Marking
-
Area is outlined using spray paint or stakes and string
-
Final shape, width, and elevations are confirmed
-
Slope is planned (usually away from the house for drainage)
👉 This step prevents water issues later
🔹 2. Excavation
-
Soil is dug out typically:
-
6–8 inches for walkways/patios
-
10–12+ inches for driveways
-
-
All organic material (grass, roots) is removed
👉 Depth matters a lot in climates with freeze-thaw like Ottawa
🔹 3. Base Installation (Most Critical Step)
-
Crushed stone (often called Granular A) is added in layers
-
Each layer is compacted using a plate compactor
-
Final base is:
-
Solid
-
Level
-
Properly sloped
-
👉 This is what prevents sinking and shifting
🔹 4. Edge Restraints
-
Installed along the perimeter
-
Usually plastic or metal, anchored with spikes
👉 Keeps pavers locked in place long-term
🔹 5. Bedding Layer (Sand)
-
A thin layer (~1 inch) of sand is spread
-
Screeded (leveled) with rails and a straight edge
👉 This creates a perfectly even surface for pavers
🔹 6. Laying the Pavers
-
Pavers are placed in the chosen pattern (e.g., herringbone, running bond)
-
Spacing is consistent using built-in joints
-
Cuts are made for edges and curves
👉 This is the visible craftsmanship part
🔹 7. Compaction
-
A plate compactor is run over the pavers
-
Helps settle them into the sand and lock them together
👉 Usually done with a protective pad to avoid scratches
🔹 8. Polymeric Sand (Jointing)
-
Special sand is swept into the joints
-
Activated with water to harden
👉 Prevents:
-
Weeds
-
Ants
-
Paver movement
🔹 9. Final Compaction & Cleanup
-
Surface is compacted again
-
Excess sand is cleaned off
-
Edges and surrounding area are tidied
🔹 10. Optional Sealing (Later Step)
-
Done after a few weeks/months
-
Enhances color and adds protection
⏱️ Timeline
-
Small walkway: 1–3 days
-
Larger projects: 3–7 days
⚠️ Where Most Problems Happen
If anything goes wrong, it’s usually here:
-
Poor compaction of the base
-
Not enough excavation depth
-
Bad drainage slope
-
Skipping edge restraints
👉 These lead to sinking, gaps, and uneven surfaces within 1–2 winters
💡 Simple Way to Think About It
-
80% foundation (invisible work)
-
20% pavers (what you see)